Better late than never! I make a home cook’s case for gardening, consider some big-picture issues, and describe this year’s seed starting efforts.
-
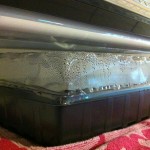
- A self-watering seedling tray takes the guesswork out of watering. Overwatering is a common cause of failure.
-
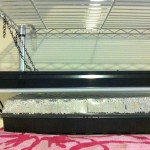
- The towel insulates the pad, otherwise the heat dissipates into the air.
-
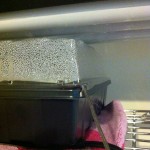
- The thermocouple works like the probe in a probe thermometer
-
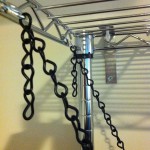
- The setup is an S-hook into the manufacturer-provided chains. This setup allows me to adjust the height of the lights in an easy way.
-
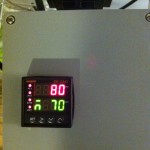
- Because the system isn’t very responsive — the heating pad isn’t powerful — I manually regulate the temperature with the PID box.
-

- The unit to be controlled plugs into the front.

Why home cooks should garden
Among regular home cooks, growing your own ingredients is economical. Once you’ve invested in equipment (long-lived) and plants (last at least one season), the cost of gardening is limited to materials and time. More importantly, gardening knowledge accumulates over time and depreciates slowly. So if you can imagine yourself as a gardener in the long term, and believe me the longer you live the more of a homebody you become, the benefits of gardening are likely to exceed their costs. I like to think of the time I spend on gardening as an investment in a productive hobby.
More importantly, tending a home garden yields better-tasting ingredients. Many commercial growers do not maximize flavor. The mechanism is variety. The varieties suitable for shipping trade off hardiness against flavor, the typical supermarket tomato is a prime example. Home gardeners are much less constrained and can select better-tasting varieties. Even if there is a local farmstand that grows some of these varieties, there is always room for you to specialize and experiment.
Third, store quantities don’t always match cooking quantities. Basil provides a good example. Sometimes I only want a few leaves for my tomato sauce. Other times I want handfuls for pesto. Supermarket basil doesn’t seem to be sold in either of these quantities. It’s more convenient (and economical) to pick from a basil plant.
Finally, gardening is full of traditions. These traditions define a real community of gardeners. Just as I’ve found that all parents love to talk about their (young) children, I’ve also found that all gardeners love to talk about their gardens and have been more than generous with their time, advice, and sources. My mom is thrilled I’ve gotten into gardening. Just as I hope my daughter will cook with me as she grows up, I hope she’ll garden with me and her grandmothers as well. Hopefully her “helping” me start seeds has whetted her appetite. We’re checking in on them daily after we get home from day care.
Types of gardens
The most practical distinction is between container and in-ground gardening. A container garden is gardening done in pots or other containers. In-ground gardening is done in your soil. From beginner to beginner, I think we’re better off starting with containers. Pathogens and pests are less likely to bother plants in containers than in the soil. Better to keep things simple in the beginning.
Another important characteristic is size. I started out a little too big last year and my plants suffered. You’re much less likely to be overwhelmed if you keep your garden small.
The final distinction is how plants get started. For each plant, the two options are to start from seed or buy a seedling. Buying seedlings is more convenient, as the nursery has done the work of nurturing the plant from seed. This service comes at a price, of course. Buying seeds can be more economical — once the initial investment is amortized — but there is more risk as well. If you currently have a black thumb (like me, though I’m working it off), starting seeds provides more opportunity for you to kill your plants.
Once you have your bearings, jumping into in-ground gardening, expanding the size of your garden will be more feasible, or changing the way you start plants. Last year I bought seedlings and grew in containers. This year I’ve decided to grow a greater variety of plants, shrink the number of pots I tend to, and start from seed.
Choosing plants and varieties
I should move from concepts to practice. The two big questions confronting me this year are “What plants will I grow?” and “Will I start seeds successfully?” I tried to go about the former in an organized way. I first created a table of plants and their harvest months from Bob Thomson’s The New Victory Garden, a book based on the classic television series. The book was recommended to me by a gardener I met last year. To digress, Wikipedia provides a funny “fact” on the current Victory Garden host:
The search for a new host led the producers to Jamie Durie, Australian TV personality, designer, and somewhat notoriously, former member of the Australian version of the male stripper group, the Chippendales.
Since joining the series as host in 2007, Durie has infused The Victory Garden segments with an international environmental influence and clean, modern design sensibility.
After I put together the table, my wife and I ranked our favorites. I chose the ones we’d enjoy most, subject to the constraint of a consistent harvest. No use in growing only cold-season crops (spring and fall) with nothing to eat in the summer. Here’s the worksheet:

Once we settled on a list of plants, I selected varieties for taste, time to maturity, and growing season. I’ll try to grow the plants below in the first cold season:
- Lettuces: Gourmet blend, Simpson Elite, Deer Tongue
- Peas: Super sugar snap, Mammoth melting sugar, and Mr. Big
- Tomatoes: Pink Brandywine, Rutgers, and Super Sweet 100 Hybrid
Starting seeds
Seeds require water, heat, food, and light. My approach has been to build a system with a large margin for error. Here are the components:
- Wire shelving
- Self-watering seedling tray
- Heating pad with controller
- Lights
- Power strip
- Extension cable
- Timer
To germinate seeds, you have to provide the right amount of water and heat. The self-watering seedling tray ensures the proper water supply.
The heating pad and controller helps me provide the heat. (I went overboard this year by building a PID controller, not realizing the heating pad didn’t put out enough power to make for a responsive system. I can live with the controller though, as I’d been meaning to build a secondary controlled rig for, say, yogurt making.) To sustain seeds, you have to provide the right amount of food and light. In the beginning, seedlings live off food stores in the seed. After the seeds germinate, the hanging fluorescent lights provide a long-lived, consistent supply of light. I bought a timer to make sure the lights would provide the right amount of light (i.e. 16 hours of light per day). Fertilizer can also be added to the seedling tray as necessary.
After putting together the seedling unit, starting seeds was actually very simple:
- Add growing medium to seedling tray and hydrate according to the instructions,
- Add two to three seeds to each cell in the tray (except for peas which are ginormous in comparison to, say, lettuce seeds),
- Cover, heat, and maintain water supply,
- When the first seedlings emerge, prop open the cover to improve air circulation, and
- When all the seedlings emerge, provide the light supply
A picture gallery of my setup is at the beginning of the post.
